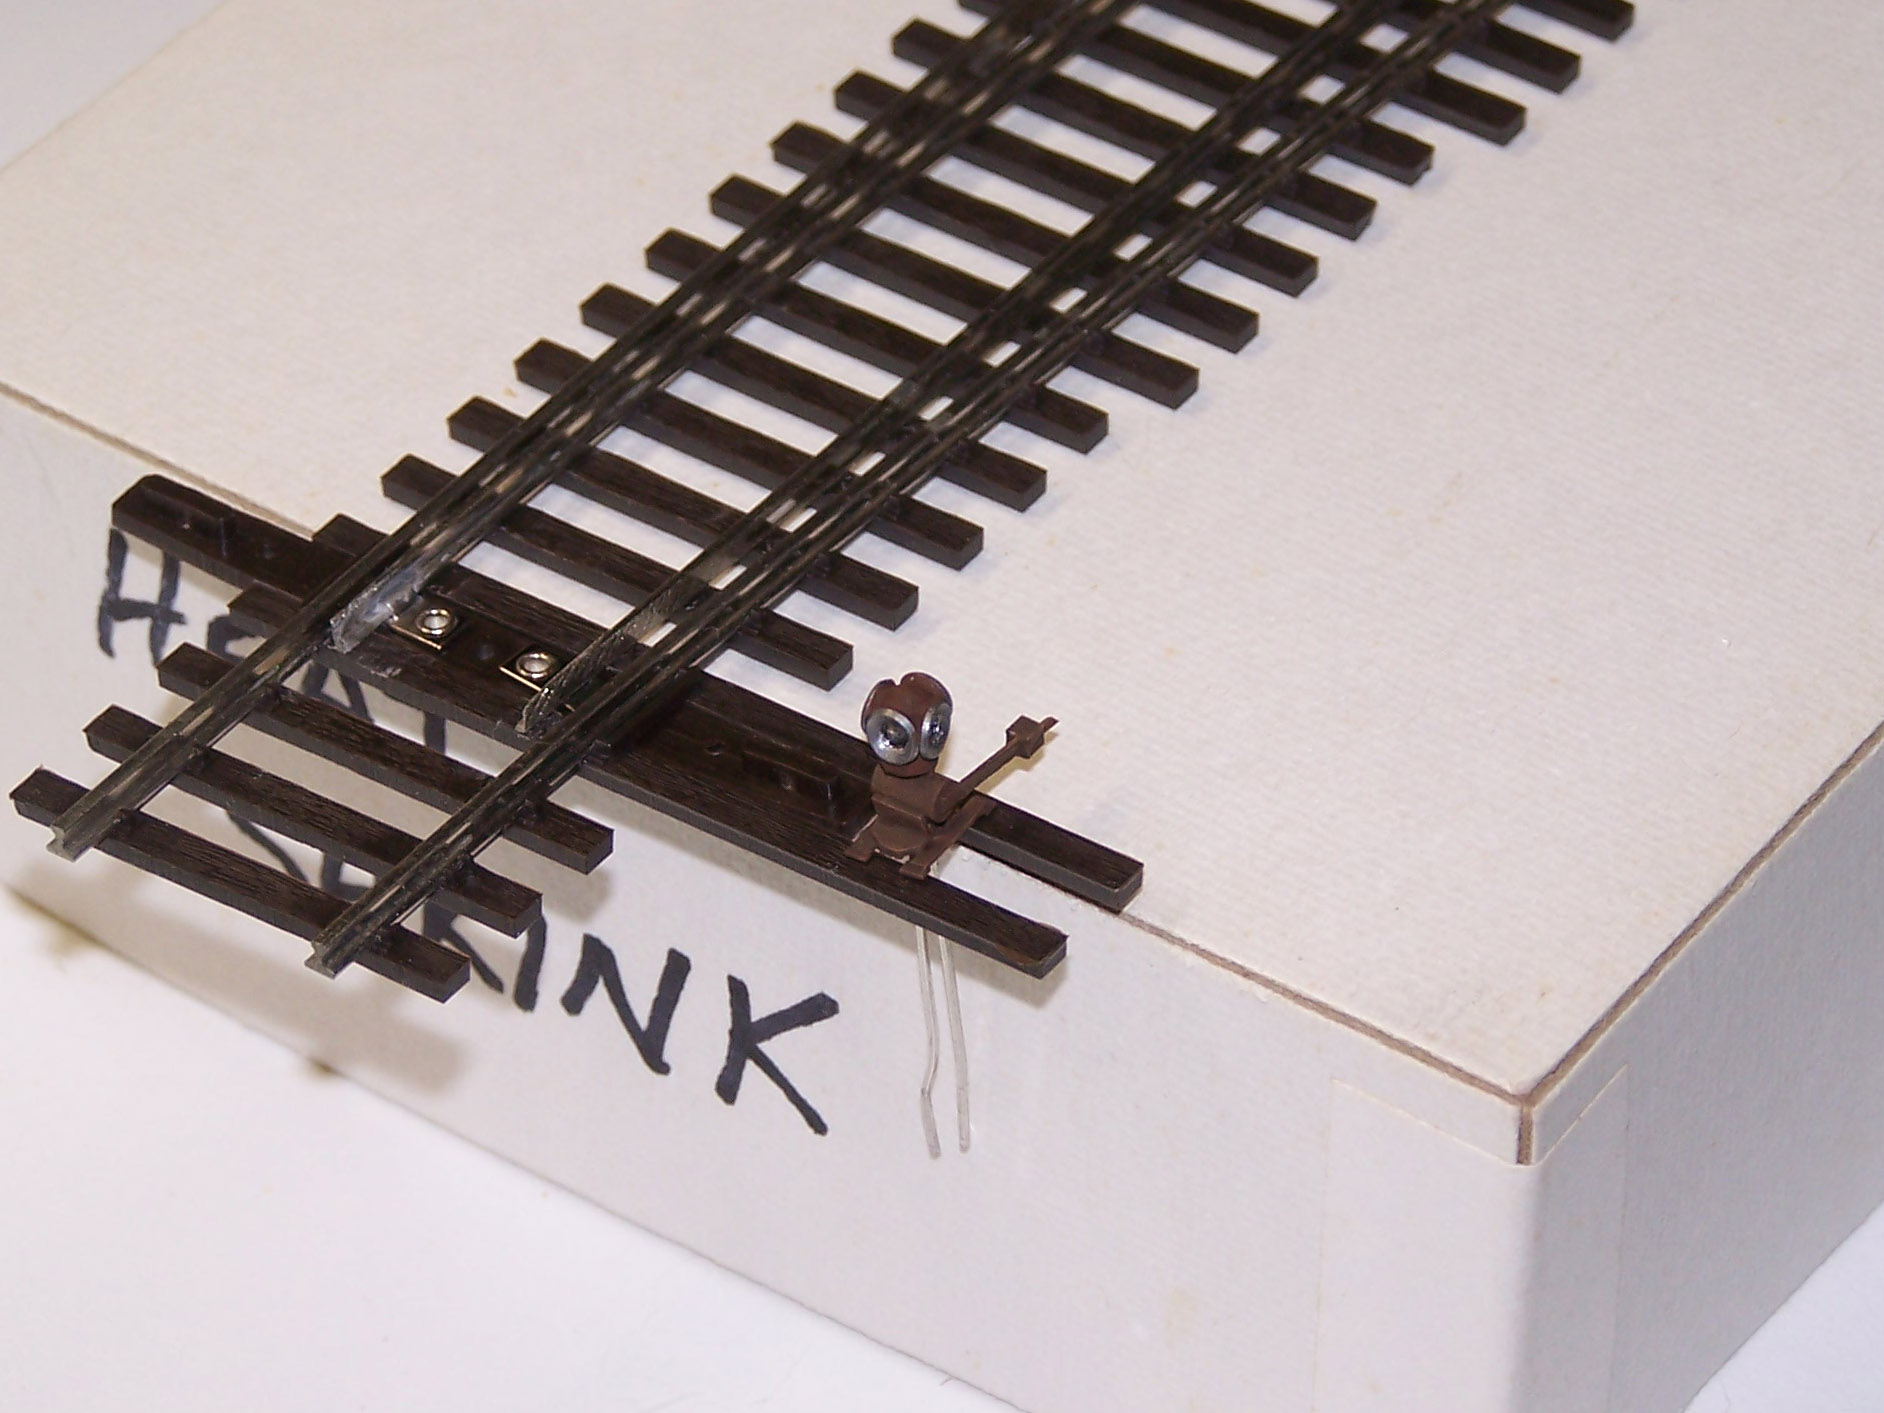
Earlier, while waiting on track caulking to dry, I played around with the idea of making my own switchstand lanterns and ground throws. The Tortoise switch machines are wired for them and I want something easy for operators to see which direction a switch is set to.
I ran across a nifty idea for using bi-color LEDs as lanterns. It was first described on this LK&O post. The original idea belongs to Bob Farrell. I found it on Waynes Trains web site. Bob’s idea is pretty straightforward and easy to make but they don’t look all that much like real switchstands. Functionally, they are perfect. The bi-color LED changes colors with switch position and the drilled holes in the LED give the impression of four 90 degree spaced lenses. It is the cosmetic aspect that I set out to improve. Plus, this would be a test to see just how much work it takes to build one thus determining whether or not it is practical to build close to a hundred of them. I could always fall back to buying and modifying cast white metal switchstands that are readily available although a bit spendy when a large number of them are needed.
Using on-hand Evergreen plastic shapes I started hacking out a prototype. Mind you this is not fine modeling. It is eyeball measuring, slice with a razor blade, close is good enough, down-n-dirty quick assembly. But it told me what I wanted to know. Yes, I can make my own switchstands and No it wasn’t difficult at all. I’m so happy with the crude prototype that I will make a few cutting and assembly jigs and mass production of refined units will get underway. Something useful to do while waiting on caulking to dry!
Check it out… Bob’s LED switchstand idea with a bunch of plastic glued on and a quick, rusty paint job. Click image for a really big version.
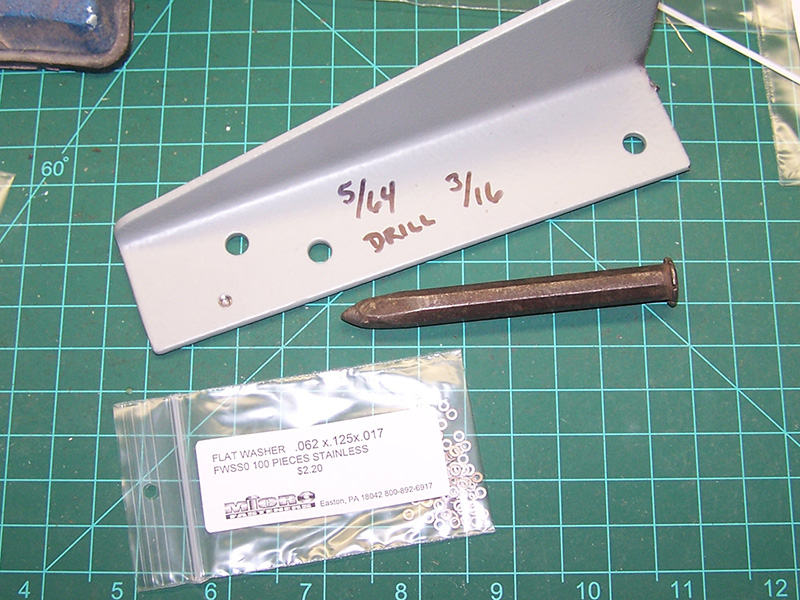
The base is made from 1/16″ angle and .040″ x .010″ strip. The body is 3/32″ round tube. The lever is .040″ x .020″ strip. The weight is 1/16″ square rod. And finally, the handle nub is .020″ round rod.
The lantern housing is a 3mm bi-color LED. The cool part is the reflectors. I drilled a shallow 5/64″ hole in a piece of heavy steel. The steel was a cutoff from my shelf bracket installation. A chamfer was cut at the top of the 5/64″ hole with a 3/16″ bit. A #0 narrow stainless steel flat washer was placed in the drill point and then whacked one time with a large bull nose punch. In a single strike I was able to make repeatable cone shaped reflectors that look convincing. Then they were simply glued onto the LED with speaker glue.
My veneer showed the overall size was in the ballpark and when I stood a HO scale figure next to the switchstand it looked right. When powered up (sorry no pic) the stainless washer reflects the LED light to make it look like a real lantern. The clear speaker glue, visible on the LED in the hole of the washer, adds a nice imitation lens effect. Much better than the point source look of the emitter junction inside the LED.
I like’em. Easy to make and more convincing than the original idea. With more care taken in cutting, assembly, and paint these switchstands will do me just fine.

Wow, so you are in the middle of building your layout, yet you still find time to do a creative side project. I admire your work ethic and productivity!
I find the green in most bi- and tri-color LEDs to be way to yellowish. I spend a little more and get the “pure green” tri-color LEDs for my searchlight signals from http://www.lc-led.com.
Incredible! What an awesome tweak of an already good idea. I’ve been looking for a good Adlake style low switch stand light, and this looks great! You should turn this in a small article for model-railroad-hobbyist.com or another publisher. I think they would eat this up.
I live a few blocks from the AC&Y and I love your take on it, your craftsmanship is superb.
John and Chris, thank you for the compliments. Although I would call it fun ethic instead of work ethic. 🙂
Todd, I agree a more bluish green would more accurately portray real signals. Unfortunately, my switchstand lanterns are not configured for common cathode like searchlight signals. Because of series wiring with the Tortoise motor the LEDs have to be back-to-back 2 lead arrangement.
Great idea Alan, I was thinking of a way to do this when I remembered you already had something like it on your blog. Your idea of the lantern look is fantastic and could easily be adapted to both a low and high level look with a bit of tubing. Pure genius. Hope everything is ok I have not seen a post from you on the MRH site for a while.
Alan,
Nice improvement on my design! I may try this myself as I have worked on several ideas to do what you have done. I was going to cast them in rubber molds but with the reflectors I had to go to a 2-pc design. I only need 32 of these and just casting the base with bolt and washer details reduces the work tremendously. I haven’t gotten back to this project since first posting in with Wayne, but still plan to do something like yours. Thanks again,
Bob
Alan,
I have since redone all of my switch stands incorporating your improvements. I must say they look 100% better than my original ones. One problem that occurred is the new Red/Green LED’s I used are much brighter than the ones I had been using so I had to put several coats of black paint to conceal the light leakage and then used white to cover the ‘lens’ areas to soften that light. Worked out OK but added a lot of work. They look great on the layout!
Bob
Bob,
Glad to hear everything worked out for you. My LEDs were deliberately selected to be low light output. I am not a fan of signals that light up the layout too much. Just enough brightness to see them is how I like it. <20 mcd
Kingbright WP937GYW
http://www.futureelectronics.com/en/technologies/semiconductors/optoelectronics/leds/Pages/1093913-WP937GYW.aspx?IM=0