My day job forces me to sit in front of a computer screen all day. Lately, my hobby is requiring me to do the same in the evenings. All day and all evening tends to make one’s eyes and butt very sore! 🙂 Why so much computer time you ask? Let me tell you a little story…
While I was scoping out the Home Depot web site for acrylic sheet from which to make the control panel faces I saw polycarbonate which  reminded me of a comment by Chuck Lee on this earlier post. So I included polycarbonate as I drilled down in the search results to the 0.118″ thickness I need. Hmmm, the only sheet size of .118 polycarbonate at Home Depot is 4’x8′ and costs $167.00. Too rich for me. How about .118 acrylic at Home Depot? Almost the same story. Smallest sheet size is 3’x6′ and costs $70.00. Feeling my wallet tightening I headed over to the TAP Plastics web site. I have bought from them before and their prices are usually reasonable. Plus, they offer cut-to-size.
Score! TAP plastics looks like the way to go. Shipping a 4’x8′ sheet of acrylic is ridiculous but the cut-to-size option is a winner. I can get finished size polycarbonate panel faces from TAP Plastics for $3.56 each. Including shipping the total bill for all 16 faces would be $64.26. That’s less expensive than the smallest sheet at Home Depot. And I have to admit there is a strong allure to having pre-sized faces to work with. Sure, I would have some plastic leftover for other projects if I buy a full sheet. But I could also waste a bunch if a snap or two goes wrong. Pre-cut it is!
So what does all this have to do with sore eyes and a sore butt? I’m getting to that…
There is a $10.00 setup charge for each size panel at TAP Plastics. To make the $65.00 figure I need to utilize a single size. Multiple sizes would quickly raise the cost. That then begs the question “What one size?” I know the maximum total height is 6″ but what width? My printer can print up to 11×17 so I am limited to a 17″ width panel. Can’t get two 6×17 prints from 11×17 but I can get two 5½x17 prints. That makes 5½” the better height choice. The printer needs a little margin on the paper so 16¾”x5¼” is a realistic maximum size print I have to work with. Working from these dimensions using ½” oak with a ¼” face panel slot plus ¼” margins equals a usable real estate area of 15¾”x4¼”. So the real question becomes “Is 15¾”x4¼” large enough for every panel?” To find out I have to do the final artwork. There’s the computer screen sore eyes and butt part.
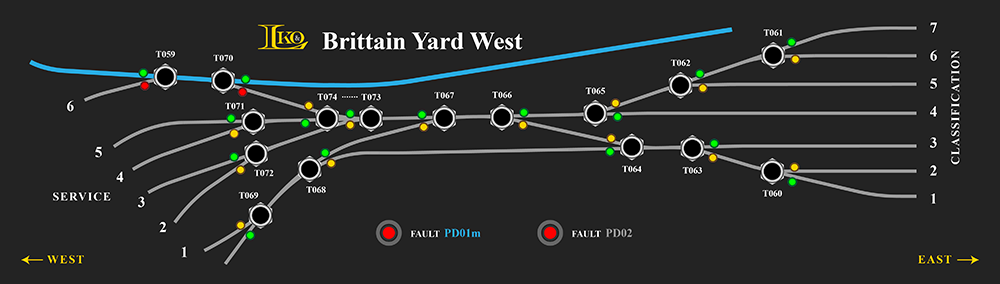
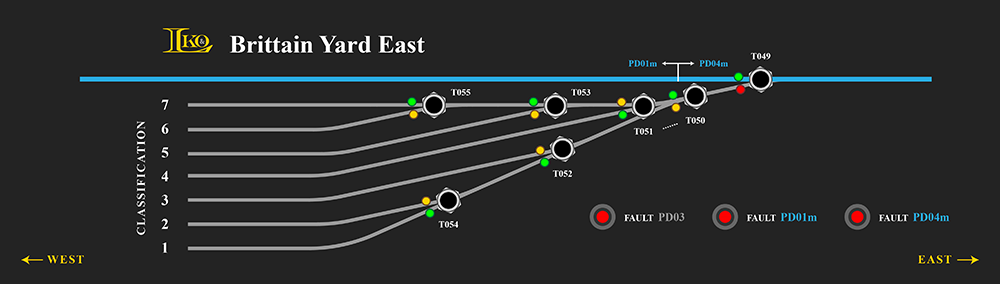
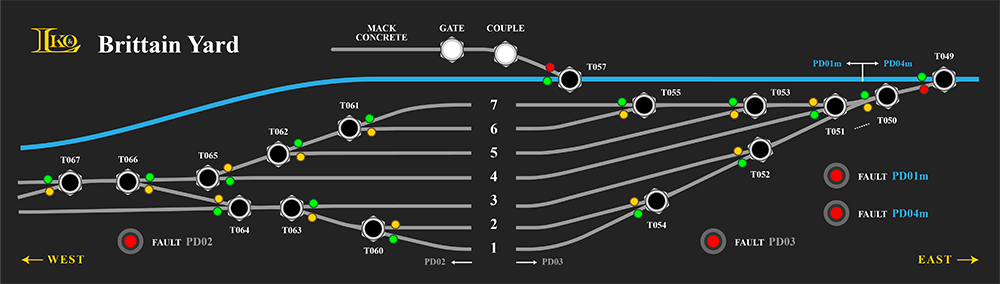
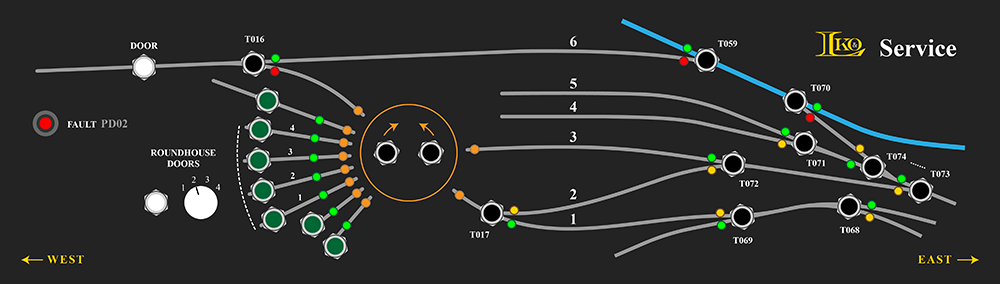
The Brittain Yard panels are the most controls dense of all the panels. It makes sense that if Brittain Yard works on 15¾”x4¾” then all the others will also. Even though I roughed in a Brittain Yard example earlier, it is time to get serious with the art making sure every component is represented at correct size and the placement is workable and ergonomic.
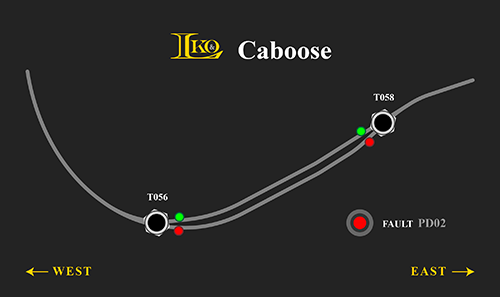
I am happy to report it appears all will work well. Below are my results. Click on them for a bigger image.
Brittain Yard West
Brittain Yard East
Brittain Yard Center
Brittain Engine Service
And finally, the Caboose Track made from 1/2 of a standard width panel
I have many panels yet to draw so hang in there. I’ll be back with more. I am all ears if you have suggestions for improvement!

Alan, As usual, another aspect of the LK&O finely done. My only suggestion would be to consider placing the Logo & descriptor for each panel in the same location (if possible) for the sake of uniformity and consistency (Ala ‘East/West’ at the bottom of each screen).
In my profession, I create touch screen user interfaces for smart home applications and avoid ‘floating’ buttons and/or labels as one scrolls from one screen to another. Although not exactly the same, there is a similar analogy and believe it creates a more professional appearence, IM(humble)O.
David, I couldn’t agree more. Started out exactly that way however the shape of the track plans quickly threw a wrench in the gears. The track representations would either be oddly skewed or unrealistically rotated to avoid a common reserved panel spot. As I gave thought to it I realized track identification is a vastly more important quality than general location identification. Unlike your touch UI, the descriptor is almost not needed on my panels. After all, an operator has the railroad in front of him. He knows where he is. Other than a quick glance the first time one sees the railroad, I doubt the descriptor will be referenced again. That is my reasoning for making the descriptor work around the controls rather than the controls work around the descriptor. Having a real railroad for visual reference is a huge advantage a device screen does not enjoy.
I did use the same descriptor vertical offset on each panel. On panels with plenty of space, like the Caboose panel, the descriptor is, and will be on future, centered on the panel.
Can you please tell me which program you used to draw the control panels that were printed on an inkjet printer. I don’t currently have a draw program that allows me to set the background color to black. Thanks.
Adobe Illustrator was used to draw the panel art.
Create a rectangle that is the same size as the artboard.
Set fill color to black.
Move to bottom layer in art stack.